> ## Documentation Index
> Fetch the complete documentation index at: https://platform.kimi.ai/docs/llms.txt
> Use this file to discover all available pages before exploring further.
# Use Kimi API Platform with Kimi Code CLI
> Connect, switch, and update Kimi Code CLI with a Kimi API Platform API Key.
[Kimi Code](https://www.kimi.com/code/) is an intelligent coding service for developers, and Kimi Code CLI is its terminal-based AI agent.
Kimi Code CLI can directly use an API Key created on [Kimi API Platform](https://platform.kimi.ai/).
This guide explains how to:
* Connect with an API Key from `platform.kimi.ai`
* Switch an existing Kimi Code CLI setup to Kimi API Platform
* Replace a configured API Key
This guide assumes that Kimi Code CLI is already installed.
If it is not installed, see the [official Kimi Code CLI installation guide](https://www.kimi.com/code/docs/en/kimi-code-cli/guides/getting-started.html), or select your system and run:
```bash theme={null}
curl -fsSL https://code.kimi.com/kimi-code/install.sh | bash
```
```powershell theme={null}
irm https://code.kimi.com/kimi-code/install.ps1 | iex
```
Before first launch on Windows, install [Git for Windows](https://gitforwindows.org/). Kimi Code CLI uses its bundled Git Bash as the Shell environment. If Git Bash is installed in a non-standard location, set `KIMI_SHELL_PATH` to the absolute path of `bash.exe`.
The script automatically downloads the latest release, verifies its checksum, and places the `kimi` executable on your `PATH`.
## Prepare an API Key
Open [Kimi API Platform](https://platform.kimi.ai/), sign in, and go to the [API Keys](https://platform.kimi.ai/console/api-keys) page. Create and copy an API Key.
Keep your API Key secure. Do not share it or expose the complete value in screenshots.
## Connect Kimi API Platform
### 1. Start Kimi Code CLI
Open the project directory where you want to use Kimi Code CLI, then start it:
```bash theme={null}
kimi
```
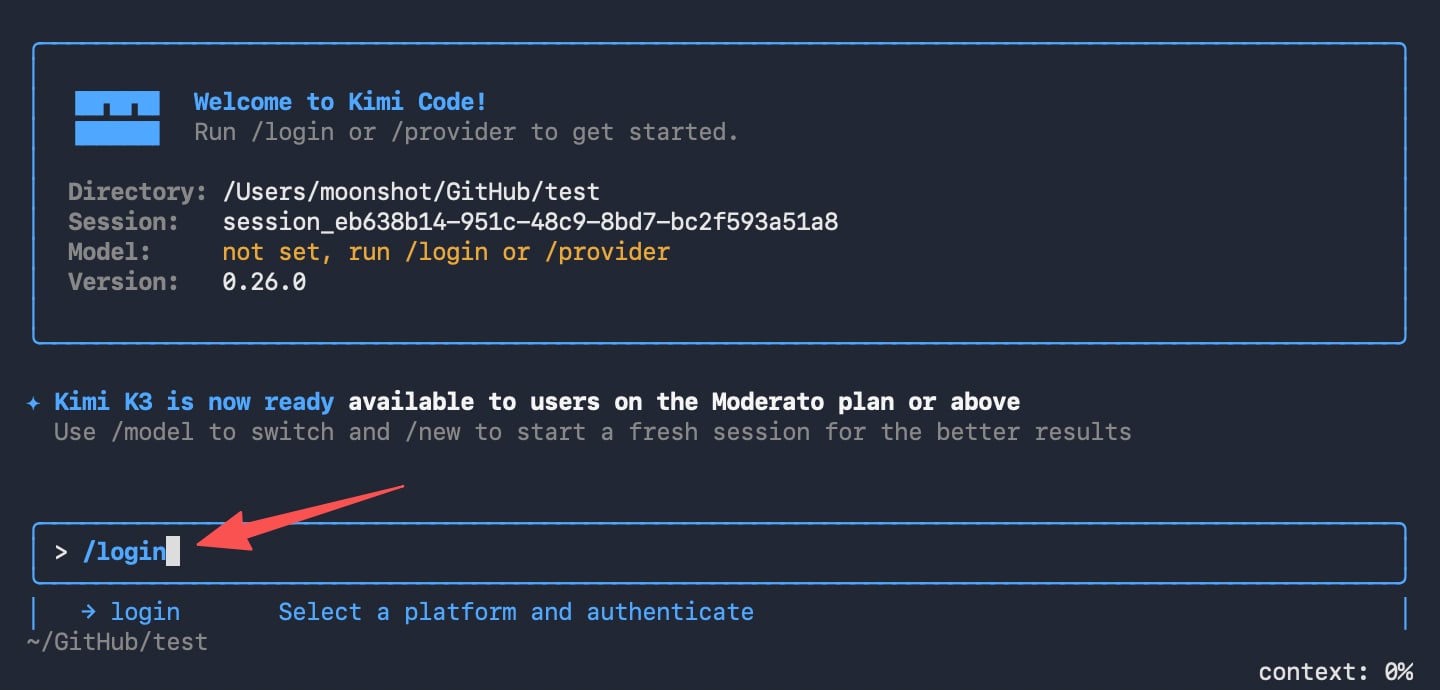
In the interactive interface, enter:
```text theme={null}
/login
```
Kimi Code CLI opens the platform selector.
 ### 2. Select the API Key platform
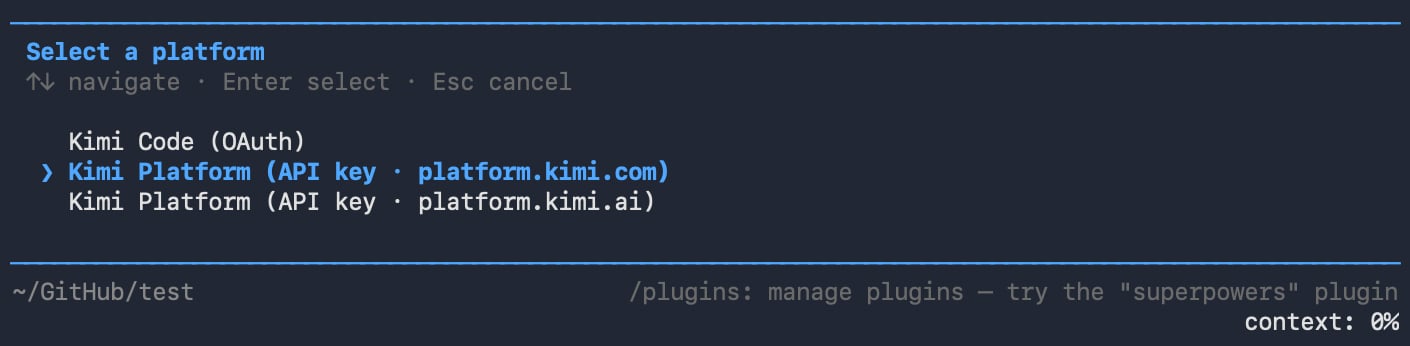
Select the option that matches where the API Key was created:
| API Key source | Select in Kimi Code CLI |
| ------------------ | -------------------------------------------- |
| `platform.kimi.ai` | `Kimi Platform (API key · platform.kimi.ai)` |
Use the arrow keys to select the platform, then press `Enter`.
The selected platform must match the site where the API Key was created, or API Key validation will fail.
### 2. Select the API Key platform
Select the option that matches where the API Key was created:
| API Key source | Select in Kimi Code CLI |
| ------------------ | -------------------------------------------- |
| `platform.kimi.ai` | `Kimi Platform (API key · platform.kimi.ai)` |
Use the arrow keys to select the platform, then press `Enter`.
The selected platform must match the site where the API Key was created, or API Key validation will fail.
 ### 3. Enter the API Key
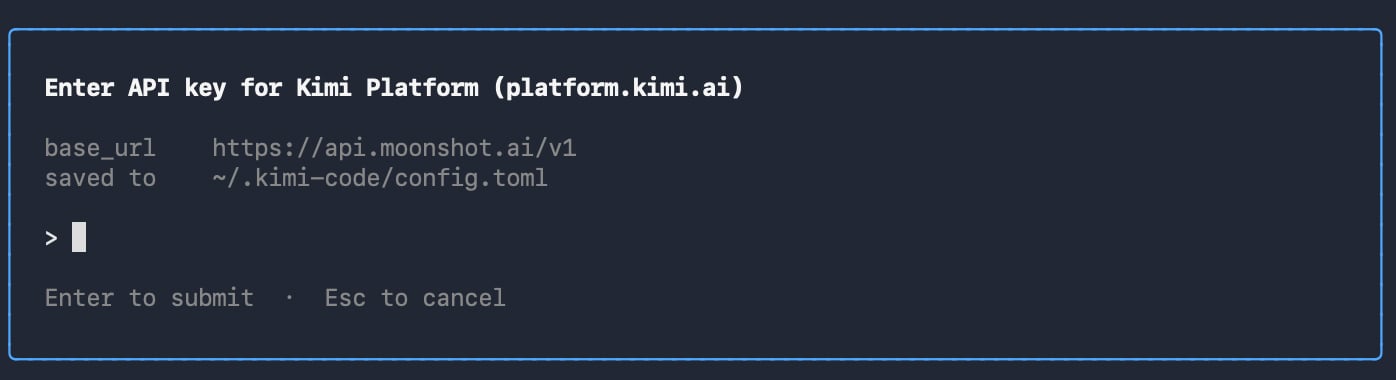
Paste the API Key when prompted, then press `Enter`.
Kimi Code CLI validates the API Key and loads the models available to the account.
### 3. Enter the API Key
Paste the API Key when prompted, then press `Enter`.
Kimi Code CLI validates the API Key and loads the models available to the account.
 ### 4. Select a model
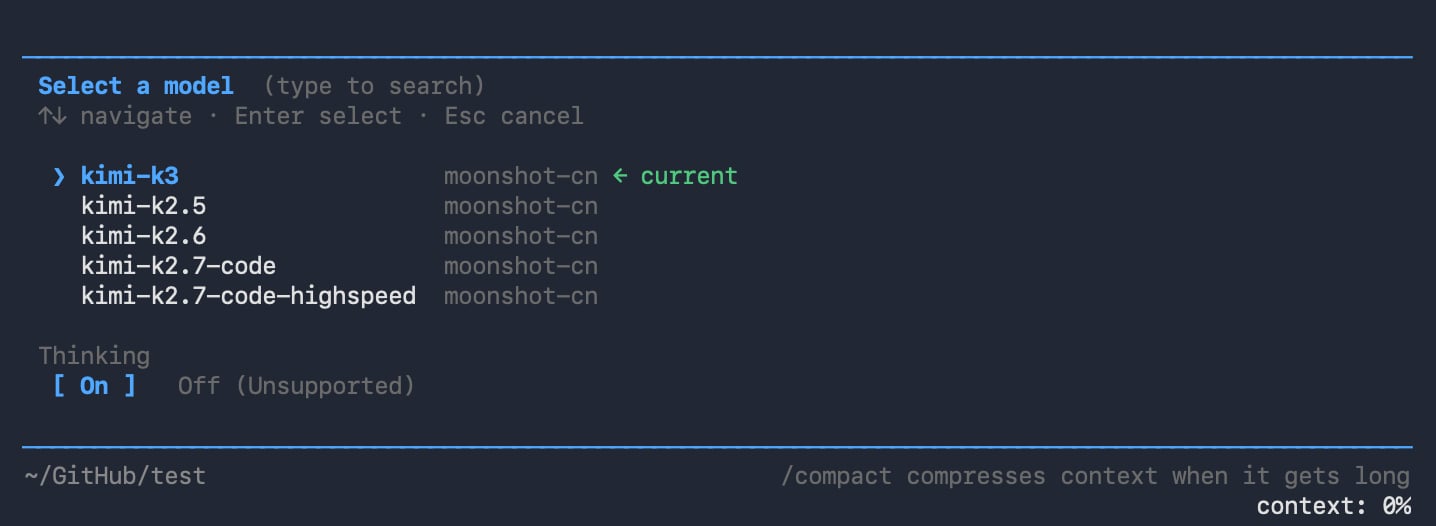
After the API Key is validated, Kimi Code CLI displays the models available to the account. Select the model you want to use and confirm.
Kimi Code CLI then:
* Switches the current session to the selected model
* Saves the selected platform and model
* Reuses this configuration on later launches
When the configuration confirmation appears, Kimi API Platform is connected.
### 4. Select a model
After the API Key is validated, Kimi Code CLI displays the models available to the account. Select the model you want to use and confirm.
Kimi Code CLI then:
* Switches the current session to the selected model
* Saves the selected platform and model
* Reuses this configuration on later launches
When the configuration confirmation appears, Kimi API Platform is connected.
 ### 5. Verify the connection
Run the following command to view the current session status:
```text theme={null}
/status
```
Confirm the current model, then send a simple task, for example:
```text theme={null}
Review the current project and briefly describe its directory structure.
```
If Kimi Code CLI returns a normal response, the connection is working.
### 5. Verify the connection
Run the following command to view the current session status:
```text theme={null}
/status
```
Confirm the current model, then send a simple task, for example:
```text theme={null}
Review the current project and briefly describe its directory structure.
```
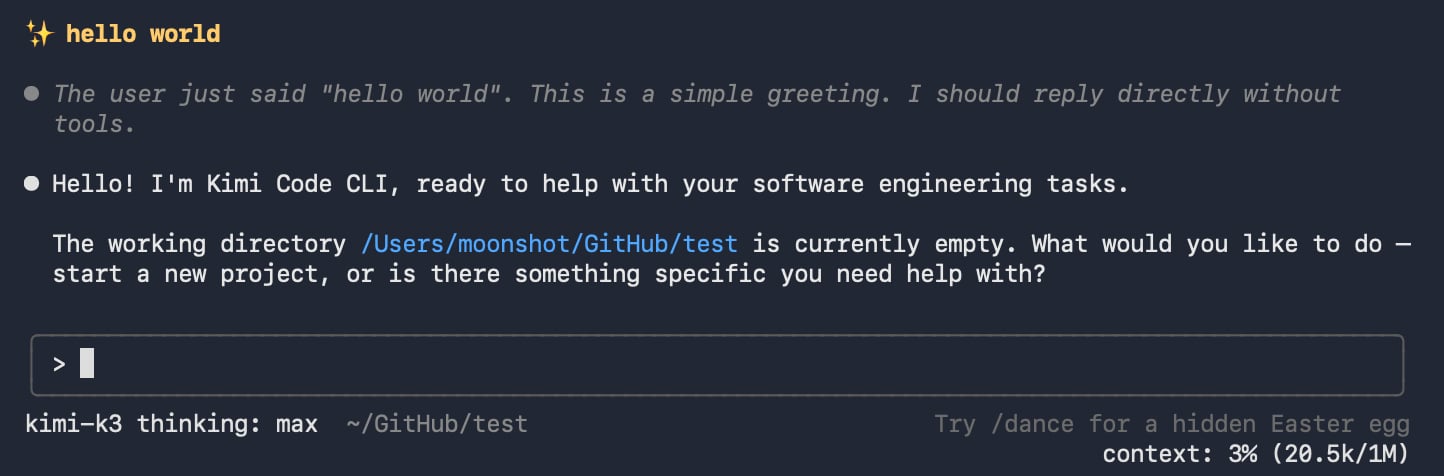
If Kimi Code CLI returns a normal response, the connection is working.
 ## Switch to a Kimi API Platform API Key
If Kimi Code CLI already uses another login method, you do not need to exit the program or edit the configuration manually.
Run the following command again in the current session:
```text theme={null}
/login
```
Then:
1. Select `Kimi Platform (API key · platform.kimi.ai)`
2. Enter the Kimi API Platform API Key
3. Select the model you want to use
4. Wait for the configuration confirmation
The current session switches directly to the selected Kimi API Platform model. You do not need to restart Kimi Code CLI.
## Replace the API Key
To replace a configured API Key, run `/login` again, select `Kimi Platform (API key · platform.kimi.ai)`, and enter the new API Key.
After configuration completes, Kimi Code CLI uses the new API Key.
## Troubleshooting
### API Key validation fails
Check the following:
* The selected platform is where the API Key was created
* The complete API Key was copied without extra spaces
* The API Key is still valid
* The corresponding Kimi API Platform account can call the API
If the API Key was revoked or exposed, create a new API Key in Kimi API Platform and run `/login` again.
### `/login` is unavailable
`/login` must be run while Kimi Code CLI is idle. If it is generating content or running a task, wait for the task to finish, or press `Esc` or `Ctrl-C` to interrupt it before running `/login` again.
### No models are displayed
Confirm that the API Key and selected platform match, then run `/login` again. If the models still do not load, upgrade Kimi Code CLI and check the Kimi API Platform account status.
## Learn more
* [Get started with Kimi Code CLI](https://www.kimi.com/code/docs/en/kimi-code-cli/guides/getting-started.html)
* [Kimi Code CLI slash commands](https://www.kimi.com/code/docs/en/kimi-code-cli/reference/slash-commands.html)
* [Kimi Code CLI providers and models](https://www.kimi.com/code/docs/en/kimi-code-cli/configuration/providers.html)
* [Kimi Code CLI configuration files](https://www.kimi.com/code/docs/en/kimi-code-cli/configuration/config-files.html)
* [Kimi API Platform quickstart](/overview)
## Switch to a Kimi API Platform API Key
If Kimi Code CLI already uses another login method, you do not need to exit the program or edit the configuration manually.
Run the following command again in the current session:
```text theme={null}
/login
```
Then:
1. Select `Kimi Platform (API key · platform.kimi.ai)`
2. Enter the Kimi API Platform API Key
3. Select the model you want to use
4. Wait for the configuration confirmation
The current session switches directly to the selected Kimi API Platform model. You do not need to restart Kimi Code CLI.
## Replace the API Key
To replace a configured API Key, run `/login` again, select `Kimi Platform (API key · platform.kimi.ai)`, and enter the new API Key.
After configuration completes, Kimi Code CLI uses the new API Key.
## Troubleshooting
### API Key validation fails
Check the following:
* The selected platform is where the API Key was created
* The complete API Key was copied without extra spaces
* The API Key is still valid
* The corresponding Kimi API Platform account can call the API
If the API Key was revoked or exposed, create a new API Key in Kimi API Platform and run `/login` again.
### `/login` is unavailable
`/login` must be run while Kimi Code CLI is idle. If it is generating content or running a task, wait for the task to finish, or press `Esc` or `Ctrl-C` to interrupt it before running `/login` again.
### No models are displayed
Confirm that the API Key and selected platform match, then run `/login` again. If the models still do not load, upgrade Kimi Code CLI and check the Kimi API Platform account status.
## Learn more
* [Get started with Kimi Code CLI](https://www.kimi.com/code/docs/en/kimi-code-cli/guides/getting-started.html)
* [Kimi Code CLI slash commands](https://www.kimi.com/code/docs/en/kimi-code-cli/reference/slash-commands.html)
* [Kimi Code CLI providers and models](https://www.kimi.com/code/docs/en/kimi-code-cli/configuration/providers.html)
* [Kimi Code CLI configuration files](https://www.kimi.com/code/docs/en/kimi-code-cli/configuration/config-files.html)
* [Kimi API Platform quickstart](/overview)